|
Acronyms:
Keyboard Shortcut = KBS
Like the other tutorials, I'm going
to assume you have some basic knowledge of how Photoshop
works.
Items used in this tutorial:
- Photoshop 7.0
- Wacom Tablet
Please note: You do not absolutely
have to have a drawing tablet in order to do retextures/
recolors. Since I work as a part time freelance
artist, I find that it is most beneficial for me
to draw in a natural manner via a pen. If I work
with a mouse for too long my wrist hurts like nothing
else. However, everything I do on my tutorials can
be achieved by using a mouse. In fact, the three
fold making tutorials were done that way. So it
just goes to show you that you really can do really
wonderful work only with a mouse! Now onto the tutorial!
The first thing I did was dig up an
old shirt file to do a recolor of. This one was
a shirt I created for Better Bodies. All textures
you wish to do any recolors of will be on one layer.
I always like to break those up, as best as I can,
in order to keep things separated since I like working
with layers. It makes things so much easier to deal
with, at least for me. If you find layers becoming
too cumbersome, simply just select the areas you
wish to edit with the lasso, pen, or wand tool.
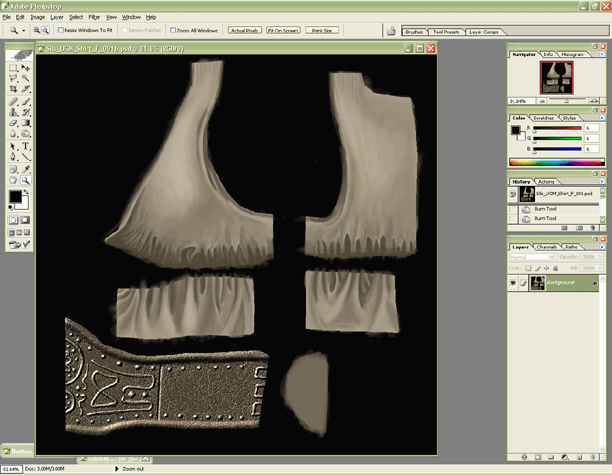
Now, with my image now loaded on my
screen, the first thing I do is rename it (if your
not wanting to change the original texture don't
do this). I named this one UCM_Shirts_F_002b.psd.
That way if I accidentally do something dumb, like
hitting CTRL - S like I've done many times before,
it won't save over the old file.
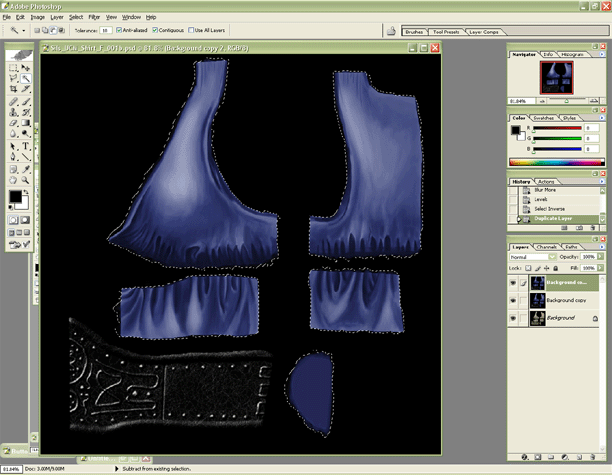
Ok, make a duplicate layer of the
master layer by going to your layers palette. Click
and drag that layer to the little icon that looks
like a piece of paper with the lower right corner
folded up. That's your copy icon. Now go into your
tools palette and select the wand tool (KBS: - W).
Make sure the tolerance level is set at a high level.
I usually have it set between 20 - 30. After you
left click, you'll notice that black background
gets selected and there are these "marching
ants" indicating where the boundary of the
selection is. Right now, you have the background
selected, but we want the shirt selected. Go up
to select>inverse (or KBS: CTRL - SHFT - I).
Now you should have the shirt and belt selected.
If you don't want to recolor the belt, use either
your marquee tool (KBS: M) or the lasso tool (KBS:
L) and deselect that area (Depressing the SHFT key
will allow you to add to the current selection,
depressing the ALT key will subtract from the current
selection). Once the shirt is selected, you're going
to remove the current color from the shirt. Yeap!
That's right, we are going to make this shirt greyscale.
The reason for this is it is much easier to replace
color, if there is no color already there. Sound
weird? Let me show you why…
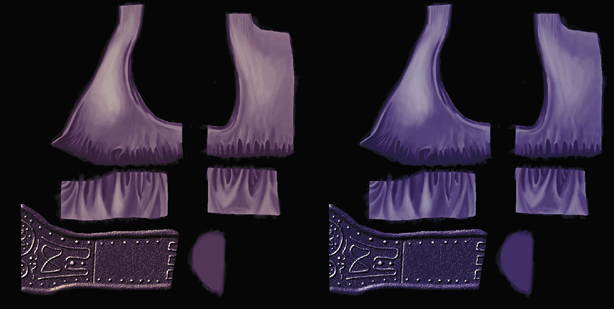
The image on the left was not reduced to greyscale
and you can see how the previous colors carried
over, making the new color much different than the
one on the right. The image on the right was reduced
to greyscale, and then its color was changed. Go
up to Image>Adjustments>Desaturate (KBS: CTRL
- SHFT - U). Now we are ready to start a recolor.
Go back into Image>Adjustments,
and select the Selective color option. Now you'll
have a separate box pop up. Here you will see that
you can take individual colors and adjust the Cyan,
Magenta, Yellow, and Black Sliders. The default
color channel should be set on Red, however the
channel you need to edit will be the Neutral one.
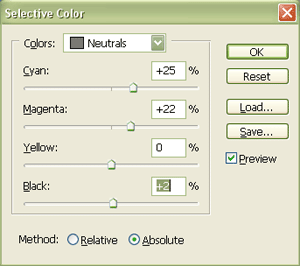 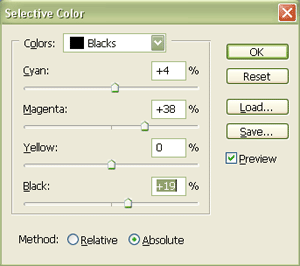
After switching the channel in the
tab, adjust the color sliders below and pick a color
you want your shirt to be. I chose a nice royal
blue. Once you got your base color working right,
click on the Black channel and adjust what you want
your shadows to be colored in. For that I made I
added a bit more red just because I don't want a
solid blue everywhere in the fabric. Click ok. Now
you have a nice texture going. Sometimes I like
to add a bit more touches to pieces to give them
a bit of a punch. Using the Dodge and Burn tool
(see dodge and burning tutorial for more info),
I made some areas just a little darker and punched
up the highlights slightly.
Viola! The shirt is done! If you want,
add a bit of texture to the fabric and fiddle with
the texture options in the Filter section. Or just
leave it as is. If you want to fix up the belt,
just repeat all these steps unless you plan on making
a brand new belt.
Hope that helps and happy recoloring!
|